Overview
WebCT is a tool that facilitates the creation of sophisticated World Wide Web-based educational environments. It does this in three ways:
Getting Started
http//:www.udel.edu/webct
| NOTE - If you have never used WebCT before, type in your Copland username a second time in place of your password. Since this is your first time logging on to WebCT, you should now change your WebCT password to your Copland password. To do this, click on Change password in the upper right hand corner of the screen. You will need to enter your Copland password twice to confirm its prior entry, and you will need to login a second time when WebCT kicks you out for being currently logged in under the wrong password. |

System setup (This has to be done each time you use a different computer!)
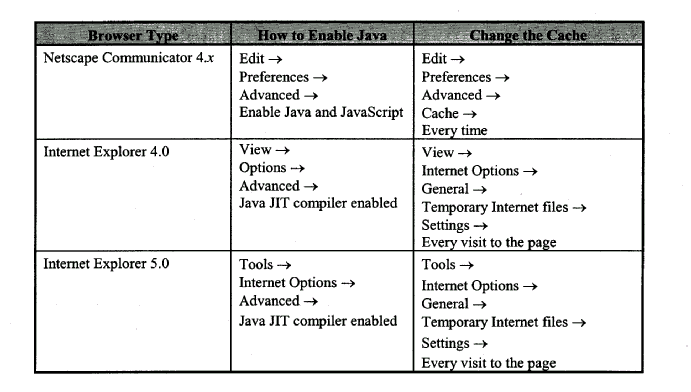
To be able to view changes as you make them while working with a WebCT course as an instructor, it is important that you set the cache settings of your browser to verify web documents Every time. If you have not made this change, your web browser will often display a cached copy of a document (i.e. a previous version which it has stored locally on your computer). In addition, you will need to Enable Java in your browser.
The following table provides the instructions for what you need to change in your browser.

THE WebCT HOMEPAGE
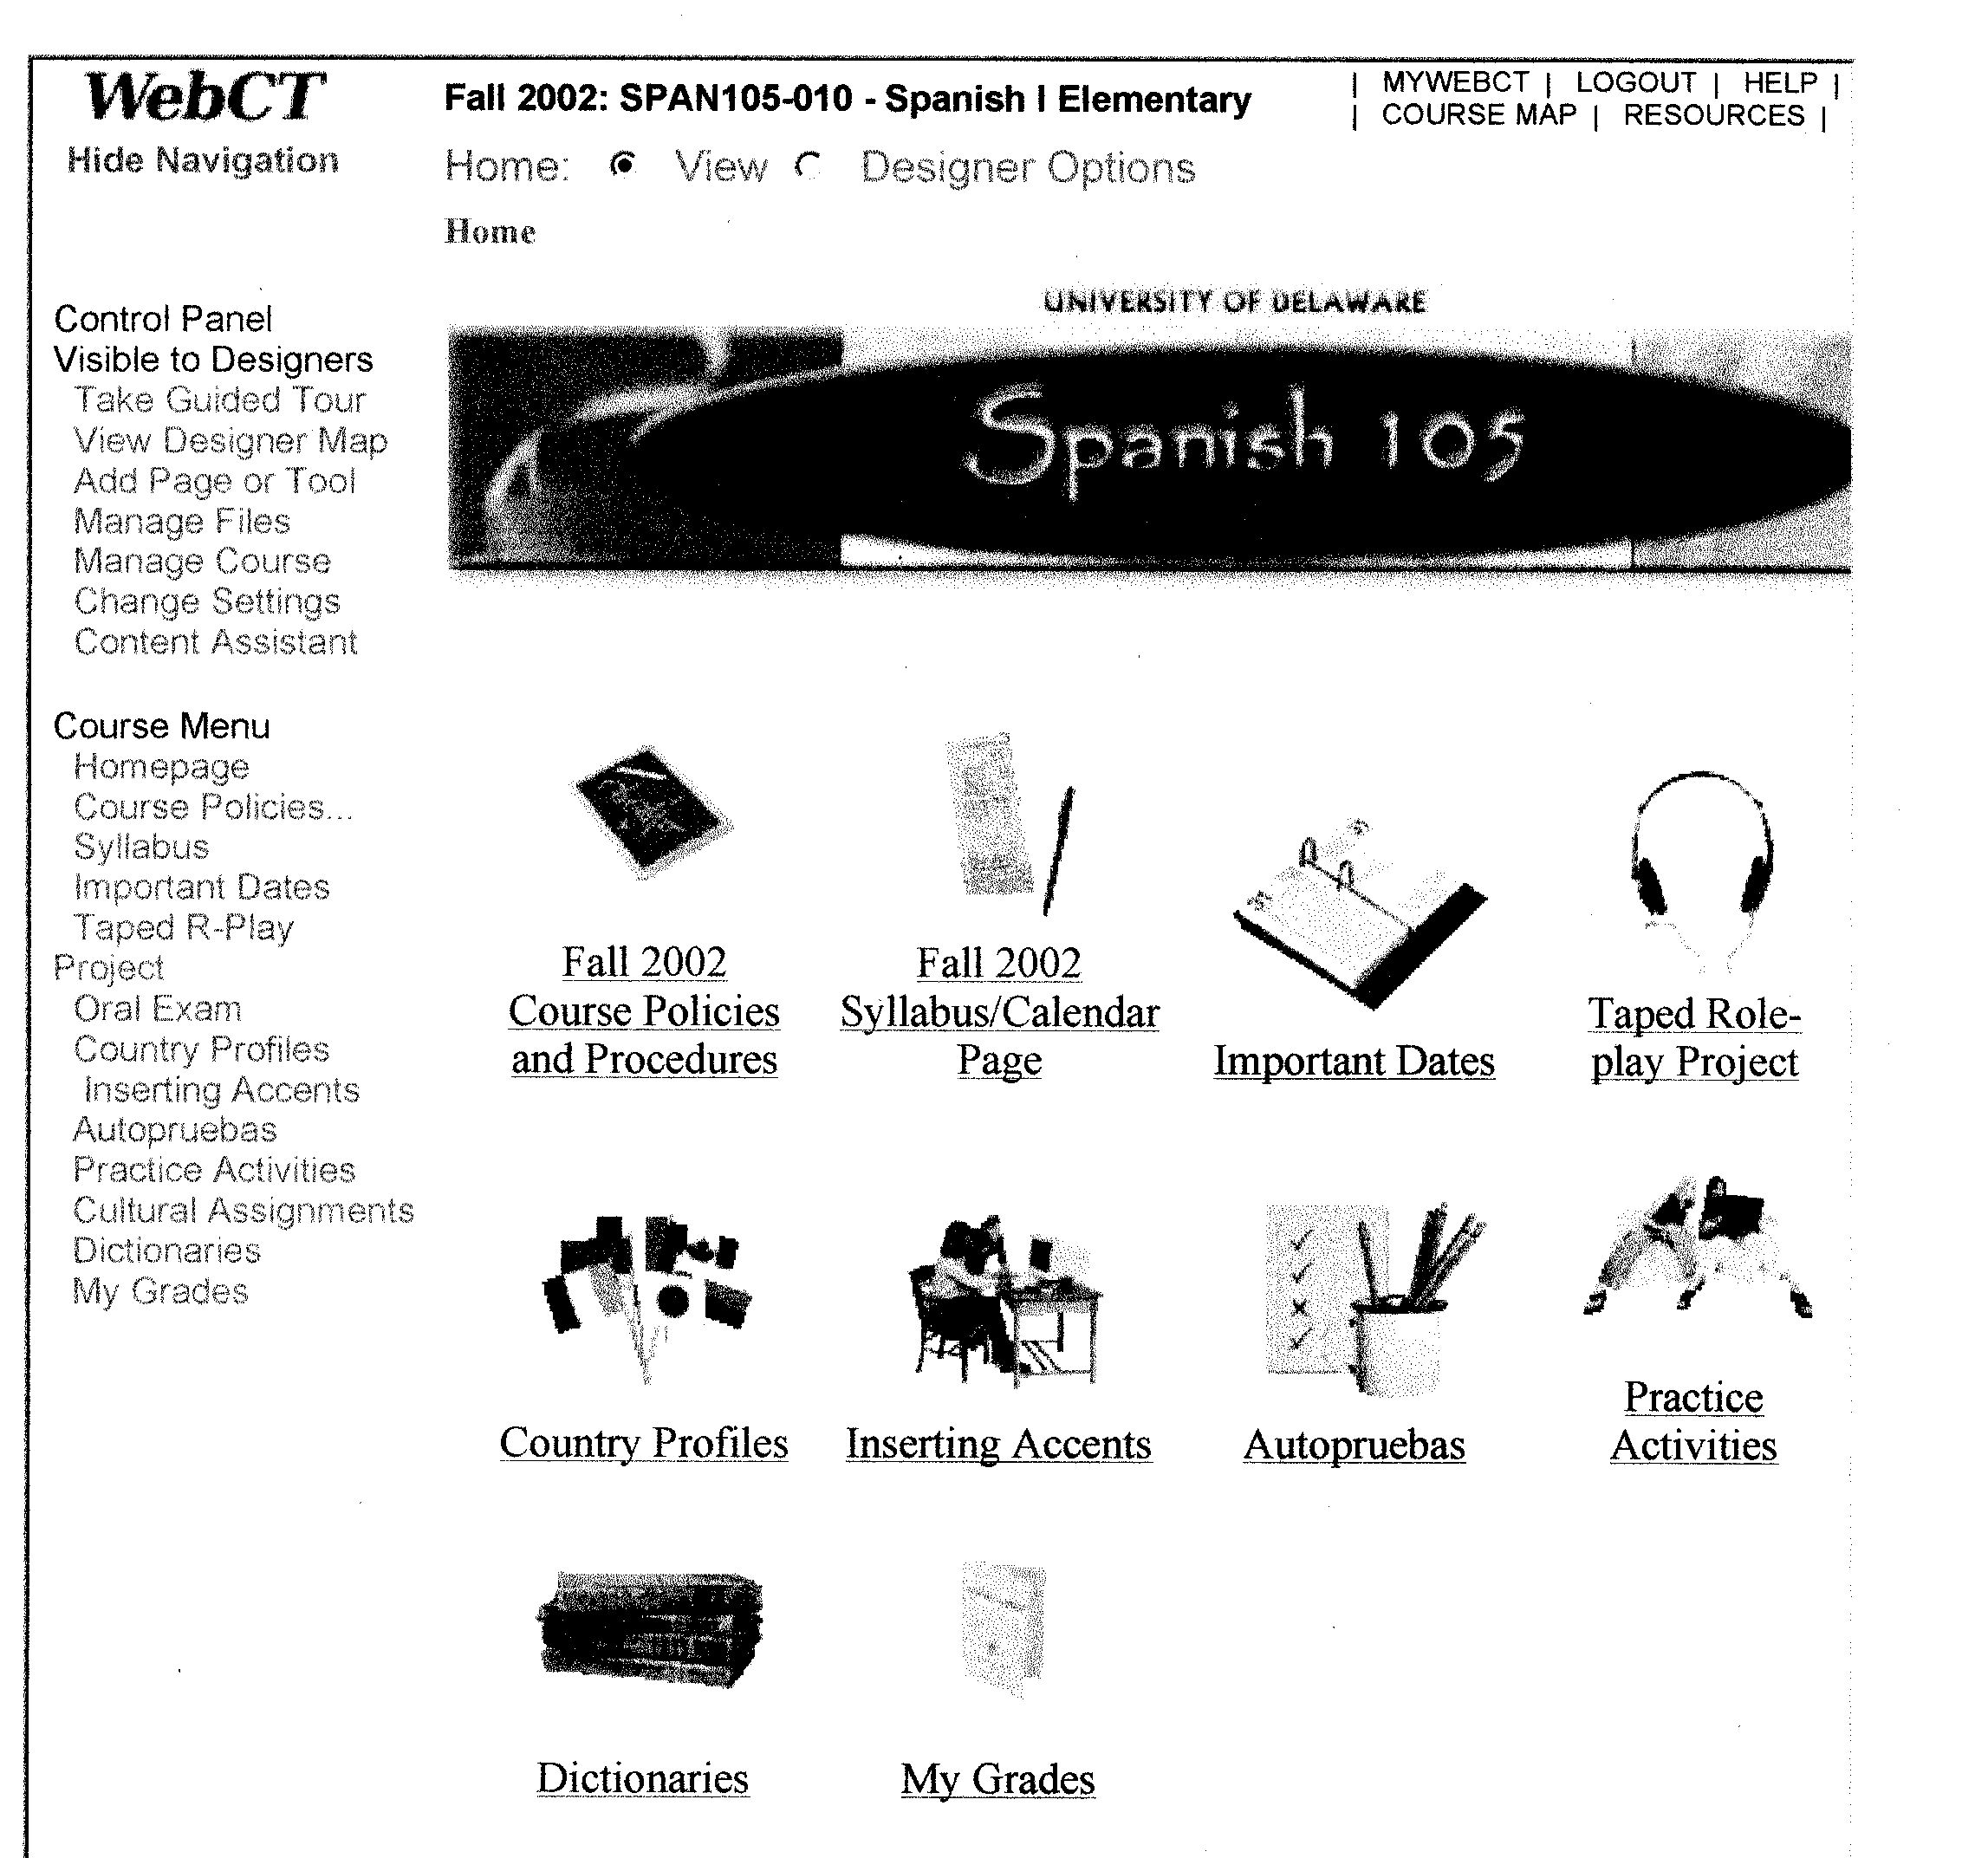
You can see by looking at the HOMEPAGE that there is more to WebCT than just a gradebook. Although most of this workshop focuses on how to input grades, please take note of the other resources that can be found on WebCT. It is important to familiarize yourself with every aspect of the WebCT page so that you can encourage your students to use WebCT to its fullest potential.
Sample HOMEPAGE:
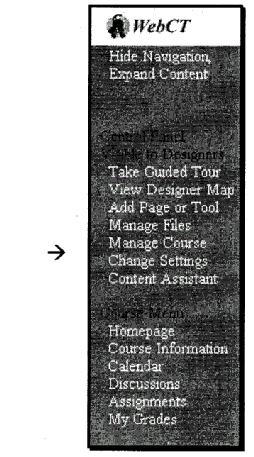
Finding your way: Navigation Bar
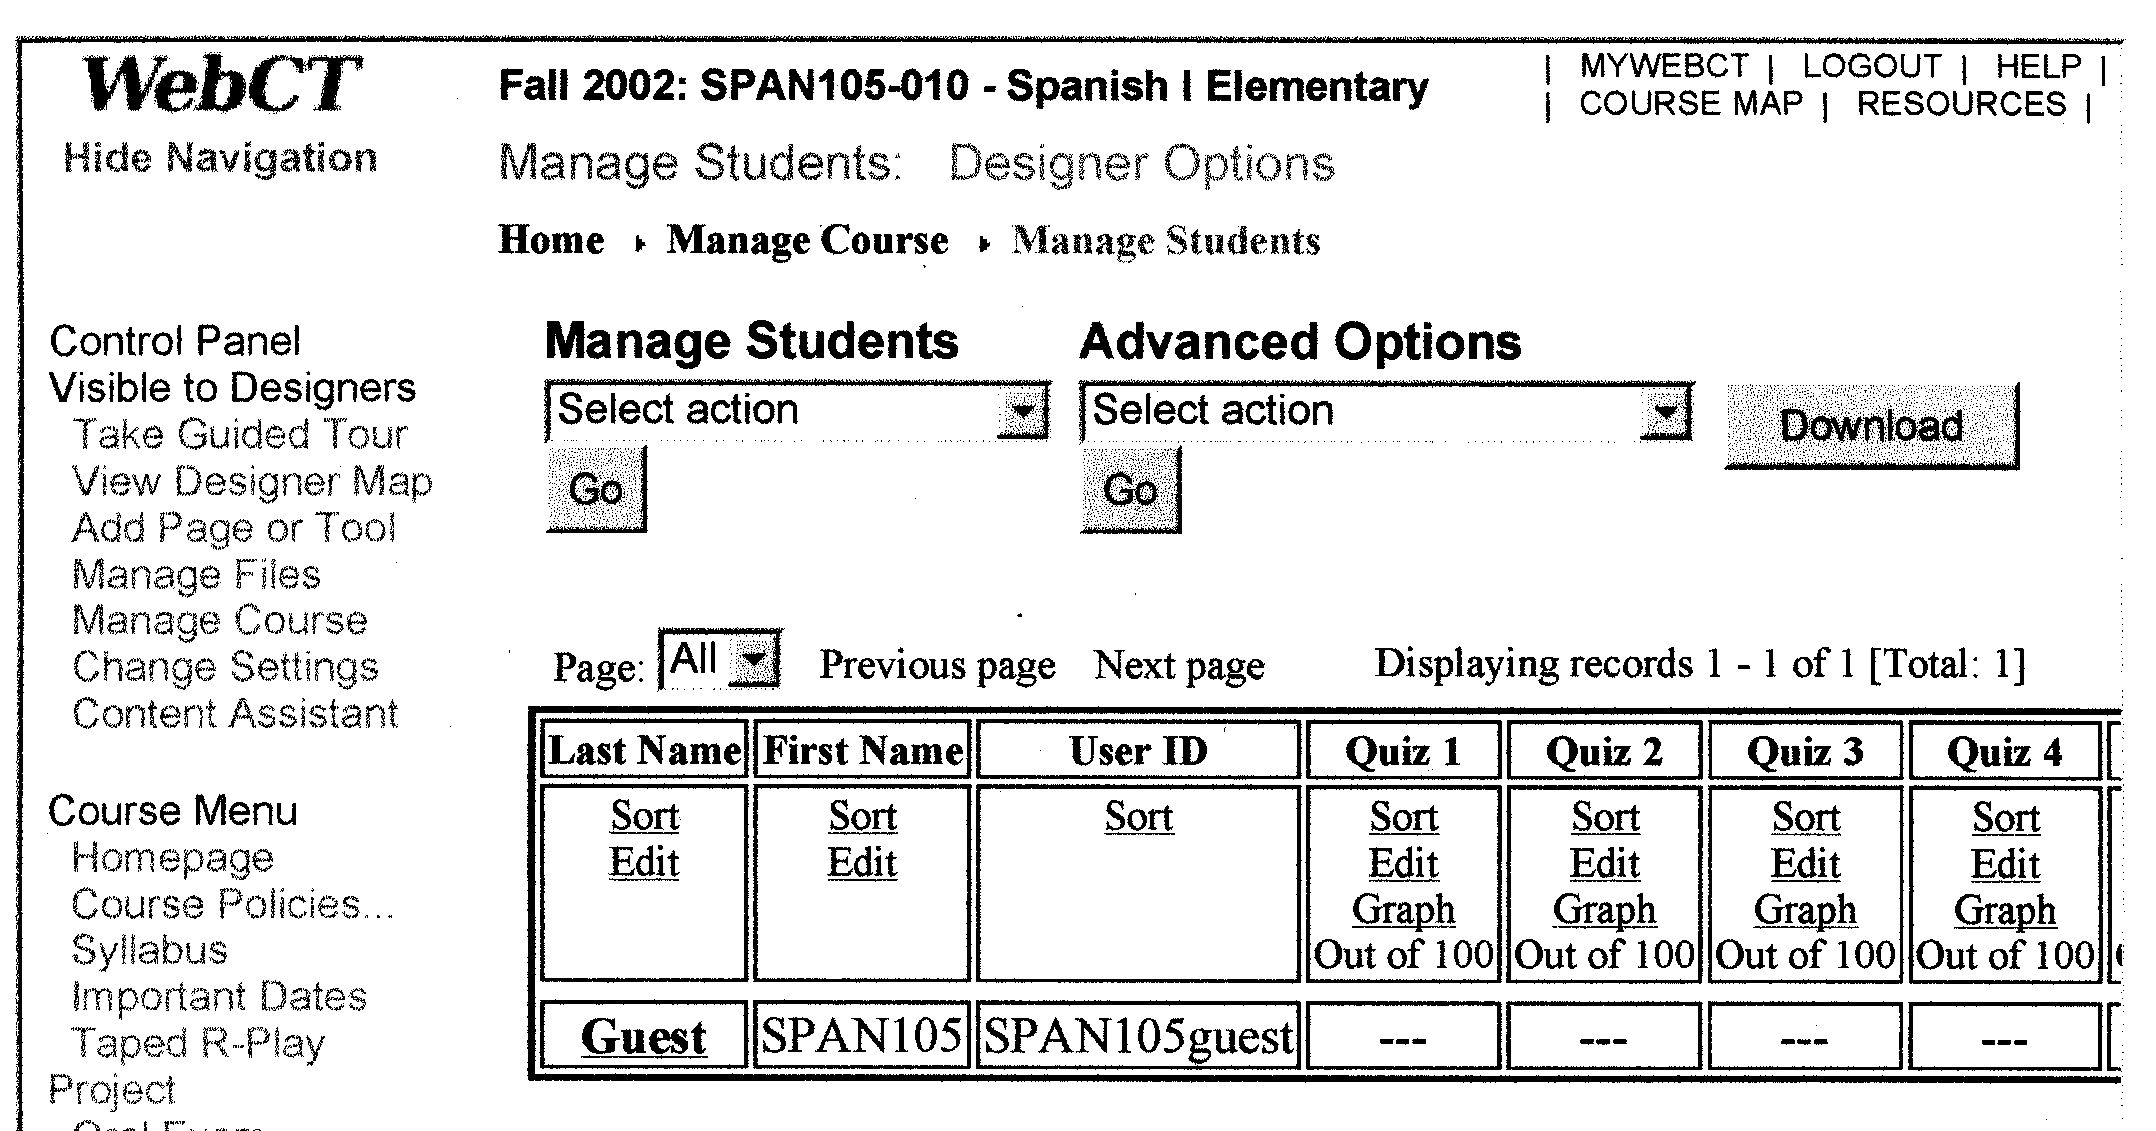
In the columns where you will add grades, there are three words SORT
/ EDIT / GRAPH. To add grades you will click on the word EDIT. The screen
will change to a column with spaces for adding names. SORT will sort the
column from highest to lowest grade. If you accidentally hit SORT and it
changes the order of the names you can change the names back to alphabetical
order by clicking on the word SORT in the Last Name column. GRAPH
will show you the mean/median for the graded assignment.
Grading: Student Management Table
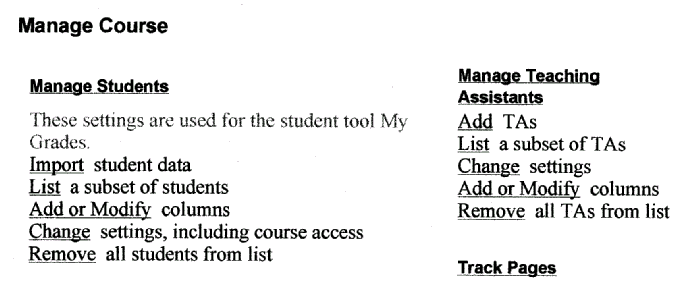
In WebCT, student information is stored in a table consisting of one row for each student and columns containing various types of data. By default, each row of the table holds the first name, last name and WebCT ID in separate columns for a particular student. (User Services is responsible for putting the names on WebCT -- make sure that all of your students have usernames in order to guarantee that they appear on your gradebook and that they receive grades).
NOTE-- If you cannot see the students names, you can move
the name column so that it is now positioned next to the column where you
are adding grades to do this follow the following steps:
|
 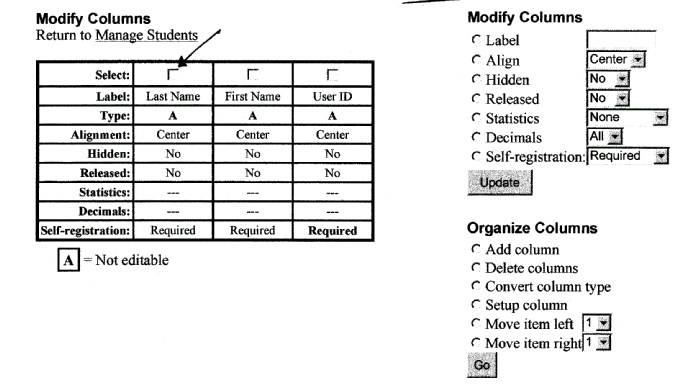 |
To go back to the Manage Students page from the Modify Columns page,
follow the BREADCRUMBS. Do not use the BACK at the top of the page. The
breadcrumbs act as links to any of the pages previously visited.
Notice the Average Columns -- The averages are not accurate in these columns until certain grades are inputted during the semester. (i.e. Midsemester Average is accurate at the middle of the semester, Prefinal Average is accurate when all grades but the Final Exam are on the gradesheet, the Final Average is accurate as soon as the Final Exam grade is placed on the gradesheet, the Letter Grade is accurate once all of the grades and attendance information have been added)
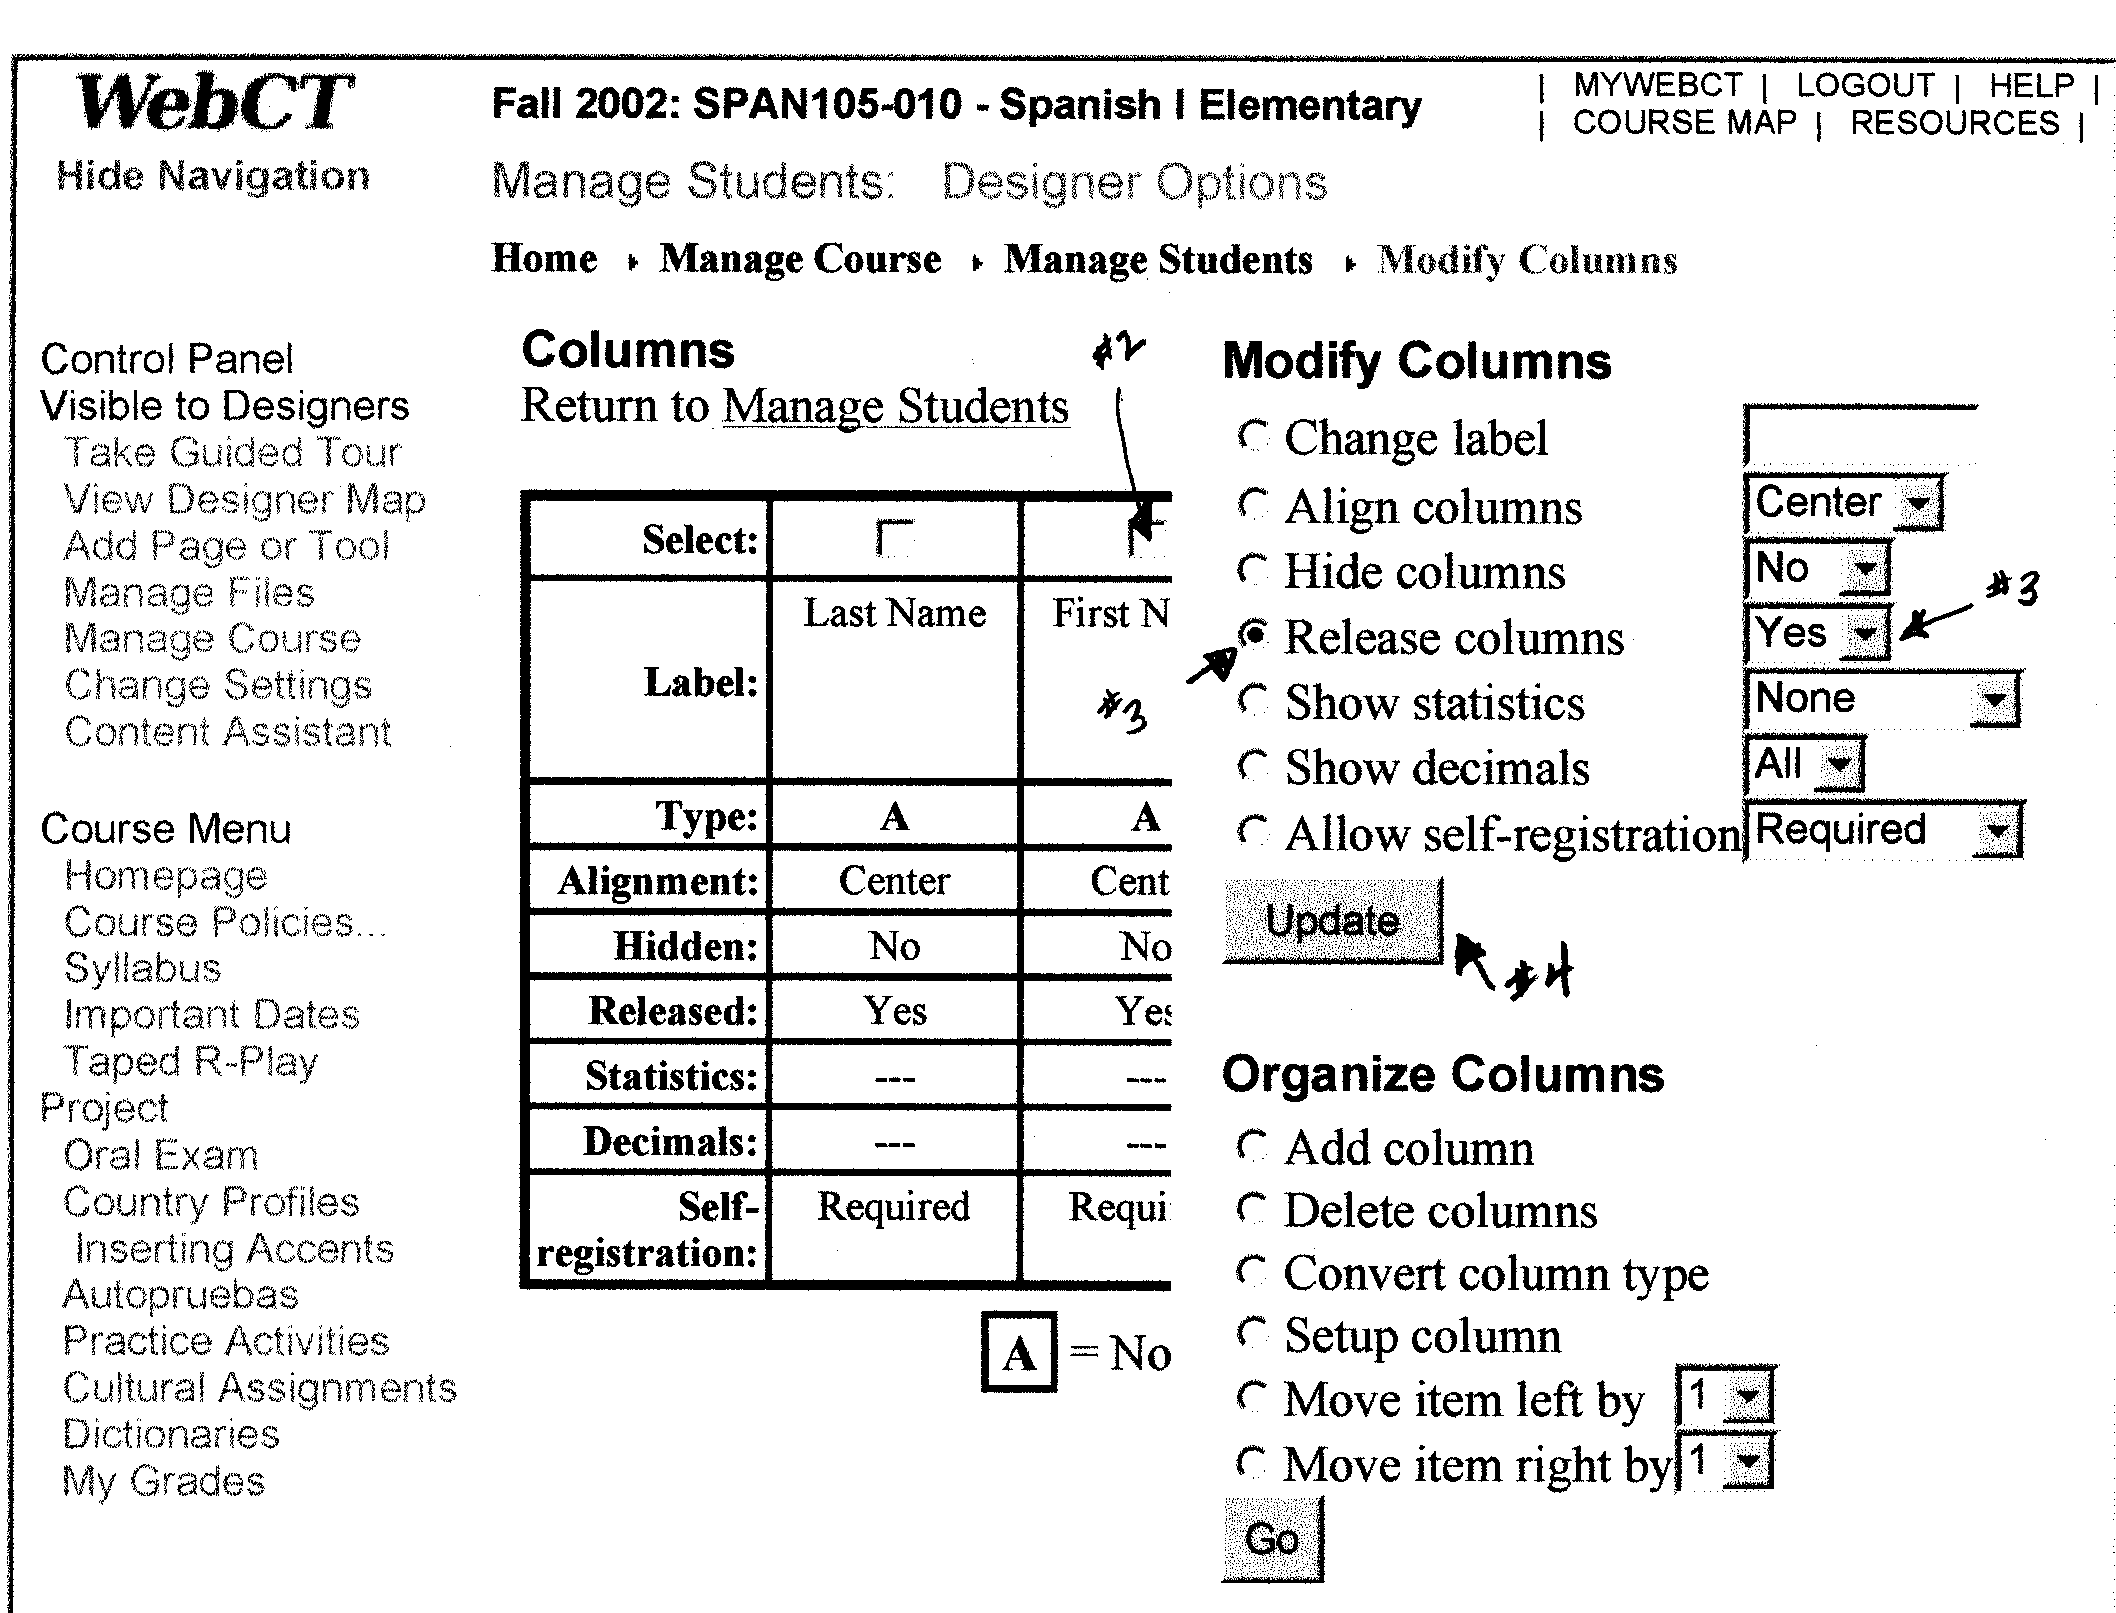
All Quiz, Composition, Class Participation Grades, Taped-role Play, Oral Exam, Reading Quiz and Final Exam columns are released to students at the beginning of the semester. All you need to do is to place the grades on the computer and students will be to view automatically those grades. Average columns however are not released to students, they are HIDDEN from their view. When these columns are accurate as the semester progresses, you need to RELEASE them to the students. Do not release Quiz/Composition/Class Participation Averages!
Releasing Grades to Students
To release the grades to the students you must use the following steps:

| You didn't click UPDATE. Click on cancel to return and save changes or click OKAY to proceed without saving. |
If you want to save hit CANCEL and then UPDATE, if you don't want to save the changes you made, click OKAY.
From time to time this message will appear even though you have clicked on UPDATE. Hit UPDATE a second time if this message (see above) reappears then just ignore it and click on OKAY, the information is saved and it gets you out of the loop.
EDITING THE RECORD OF A SINGLE STUDENT
You can delete names from your list (ONLY DO THIS WHEN YOU ARE ABSOLUTELY SURE THAT THE STUDENT IS NOT IN YOUR CLASS) or edit a single student's grade by clicking on the student's name in the LAST NAME column.
 1) To delete
a name, click on the word DELETE and then follow the instructions on the
screen.
2)To edit a single student's grade, change or add a
grade, then click on UPDATE.
Printing the WebCT gradebook
1) On the "Manage Students " page, find the word DOWNLOAD located in the top right hand corner of the page. Click on this word.

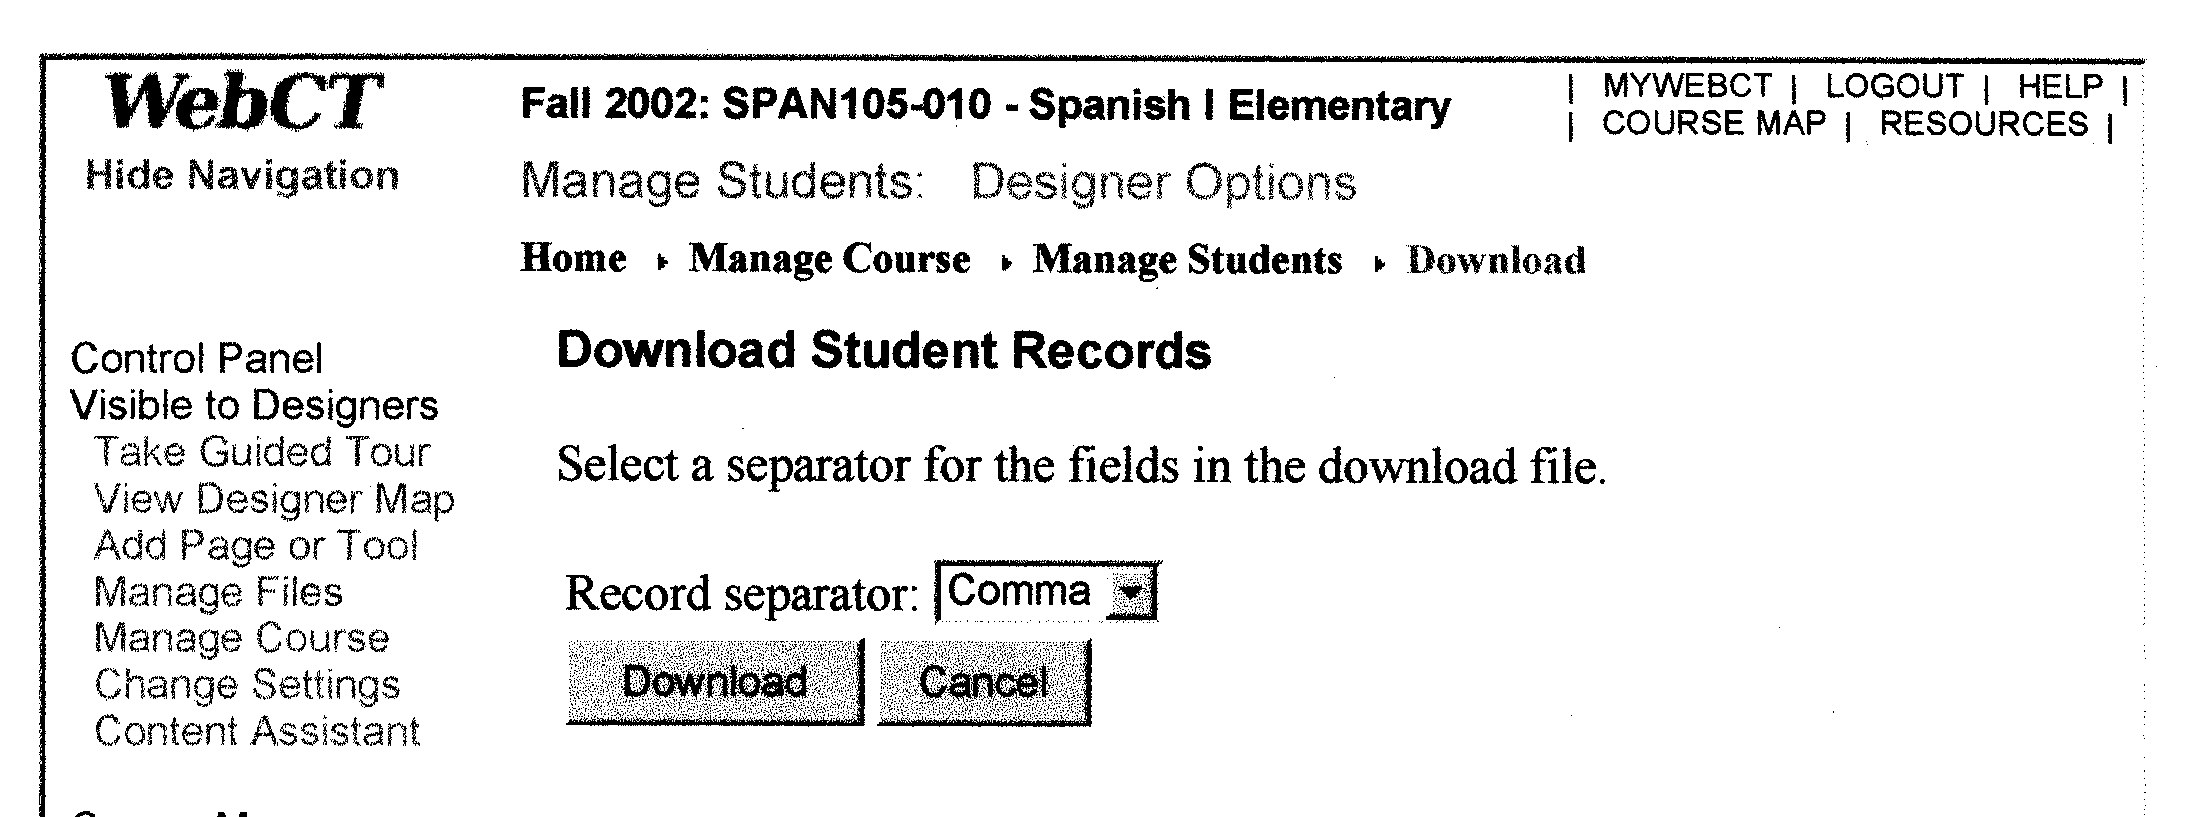
2) You should then see a screen that says "Download student records". In the box next to where it says "record separator" you should see the word COMMA in the box. If not, select COMMA. Then click on the word download again.
3) A gray box will appear which says "You have chosen to download a file from this location". Below that statement you will see two bubbles. Select the bubble to the left of the phrase "SAVE this file to a disk". Then click the OK button.
4) Another window opens which is entitled SAVE AS. In the box to the right of the words SAVE IN, you need to choose where you would like to save this file. The recommended method is to select 3½ Floppy A so as to guarantee that you do not save the file to a hard drive where it may need to be deleted (especially in the lab). If you save it to a floppy disk you do not have to worry about deleting the file off of the computer when you are finished. You then need to give the file a name. To do this you would type the name of the file in the box next to the words "File name". A sample name could be something like GRADES105015 (grades for section 105.015). Then choose in the SAVE AS TYPE box "ALL FILES". When you have finished all of these steps click on SAVE.
5) The computer will then show a picture of a file folder moving paper from one file to another and the download is complete. Close this box. Now to open the file go to EXCEL . After you have opened EXCEL, go to FILE and then to OPEN. In the box next to the words LOOK IN, choose the location of your file (preferably on a 3½ Floppy). Next to FILES OF TYPE, choose "All Files". Now select the name you gave the file and click on OPEN.
6) A window will now open that says "Text Import Wizard step 1 of 3" Check the bubble next to the word DELIMITED, then click on the word NEXT.
7) In the next window entitled "Text Import Wizard step 2 of 3", you need to check the small square box next to the word COMMA and then click on NEXT.
8) A third window appears "Text Import Wizard step 3 of 3". Under the heading "Column data format", select the word GENERAL, then click on the word FINISH.
9) You will now see an EXCEL version of the data from the WebCT gradebook, to print this document go to FILE. Then choose PRINT. To print in landscape format, go to the box marked PROPERTIES and click on it. Go to PAPER and then click on the bubble next to Landscape and then click OK. You now return to the PRINT window, click OK and the data will print out. If landscape printing is not important to you in the PRINT box just go directly to OK instead of clicking on PROPERTIES.
10) YOU HAVE NOW SUCCESSFULLY PRINTED YOUR WebCT
gradebook, if you did not save the file to a 3½ Floppy disk, make
sure to delete file from the hard drive of the computer on which you were
working. If you saved the file to a floppy disk, take the floppy with you.
Remember this information is confidential.
Don't hesitate to ask if you have any questions or problems following these instructions.