Printing with the Site Epson Printers
If you feel that a color printer will free you from the tedious task of keeping dark room records for your prints, you are mistaken. There are a number of ways to print to the Epson printers: You must choose wisely and keep notes about your images and printer settings. If you choose the wrong settings will create unexpected and undesirable results.
Many factors contribute to how your image will print, including the image color mode and the print space selected during the print process. Prints will very rarely print exactly as previewed on screen, even when using the soft proofing options available in Photoshop.
Check Printer Settings
You should ALWAYS check the printer settings before you print. NEVER just use the print command as is. This task is critical, especially in the Recitation computing site, where the settings are being changed constantly.Gamut Warning Preview
Another overlooked factor is color gamut. You should always use Gamut Preview to see how much of your image is out of the range of printable colors. While your monitor can display millions of colors, your printer cannot. Additionally, even if the colors are within the gamut and are printable colors, they may not print as seen on the screen. For instance, what appears blue on the screen might print as purple.
Please see the page on gamut to understand how this feature works. Use the gamut warning preview option to see and adjust problem areas before you send your file to the printer.Printer Paper
Using the professional quality verity of papers is very important as well as matching the proper paper profile. The print head changes the amount of ink sprayed on to the paper according to this setting. In addition to over-saturation of the media, choosing the wrong paper type in the set up window can change the colors in the printed image. You should NEVER use the standard site laser paper for color printing. Not only will your prints look bad, the fibers will gunk up the print head. Standard paper should only be used when checking and cleaning the print heads.
Understanding Epson Inks
One last thing to keep in mind is the behavior of the Epson printer inks themselves. The 1280 usees photographic dye-based ink. The 2200 uses UltraChrome pigments.
The photographic dye inks in the 1280 and 1270 work on a large range of paper types. On the professional papers, they are waterproof and will last a long time if protected from UV light. They have a large gamut (i.e., more colorful range), and colors are generally brighter.
The 2200’s pigment inks are also waterproof on the professional papers and have a very limited range of preferred papers (the Premium family). In fact, images printed on standard photo types of papers can look very bad when used with pigment inks. Even when using the Epson photo brands. Pigment inks have a smaller color gamut and are not as bright at as dye inks. The limited gamut is not so noticeable on the premium papers, but it really shows up on non-premium papers and standard glossy photo paper.
Color Casts and Metamerism
The inks in both these family of printers can produce a reddish tint in the images, especially in the mid-tones. Both kinds of inks have a tendency to have metamerism issues. Metamerism is the shifting of colors under various light sources. These inks may have been developed to look best under tungsten lights.
Other Resources
There are a number of good sources and newsgroups on the web to get and exchange information about Epson color and black and white printing issues. There is also a useful and highly recommened book called “Mastering Digital Printing” by Harold Johnson (Musk & Lipman). These resources are worth exploring if you are serious about printing digital images.
Letting the Epson Driver Print your Image
This option takes your image as is, in whatever color mode it is in, directly to the Epson software. You then tell the Epson software how you want it printed, and Epson will convert the information to produce the print.
Letting Photoshop Have Control
If you tell Photoshop how you would like to print the image it will bypasses the Epson software conversion.
In either case, you must choose what color space, rendering intent, paper type, resolution, etc. that you wish to use. Sending mixed commands and printing out-of-gamut colors are the most common causes of poorly colored images and unexpected results. Often you may set Photoshop to print the image only to cancel it in the print dialog box if you set the wrong printer options for Photoshop printing.
Each of the printing options produces different output. Some are very slight differences in appearance and some are very drastic and unappealing. Only through experimentation and good note keeping will you be able to determine the options best for your image.
An Example of a Print Settings Test
1. Take a represenative slice of your image.
2. Make a Photoshop file with multiple layers containing a copy of the slice in an evenly spaced row.
3. Turn off all but the first layer.
4. Set up the printer to print with the desired setting, keeping track of what you chose.
5. Turn off the first image and make the second layer visible.
6. Choose a different setting.
7. Continue this process until you find the best setting for the image.
Finally, print the larger original file with the best settings from step 4.
Guidelines
Below are guidelines for both Photoshop and Epson printer settings. There are many other factors that affect how your image will reproduce what is on screen. These instructions are guidelines to ensure that you WILL NOT send mixed commands to the printer. You will be well advised to learn more about color modes, color gamut, and soft preview. And keep detailed notes on your image and selected printer settings for consistent reproduction of your images.
The Epson Driver Setup
When you set up the printer using these settings, you are telling Photoshop to send the RGB file to the driver using ColorSync to convert the color to the profile and rendering intent you selected. All images should be in RGB for printing to Epson printers.
1. From the File menu, select Print with Preview.
The Print dialog box appears.
2. Use the Page Setup… button to choose printer and page size.
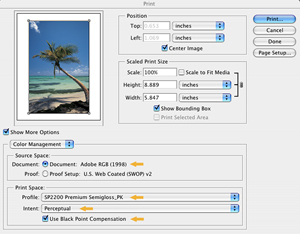
3. For Source Space, choose Adobe RGB. Check the Show More Options Box.
4. For Print Space, choose Printer Color Management and for Intent, choose Perceptual.
5. Check other settings as needed, such as Scaled Print Size, Centered, etc.
6. Click the Print… Button, and the next Print dialog box appears.
7. Make sure the proper printer is selected in the Printer setting, and enter the number of copies.
8. Click on the Copies & Pages drop-down arrow to choose Print Settings.


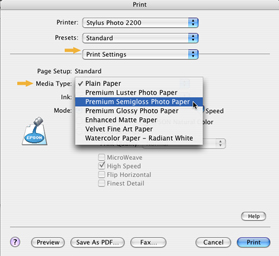
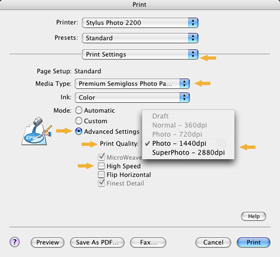
9. For Media Type, choose the proper paper type from the drop-down list.Choose Color for Color images, and move the Quality slider from Speed to Quality.
10. Under Mode, choose Advanced, and turn off High Speed
The Photoshop Drive Setup
Choosing the settings below will tell Photoshop to convert the image to the printer, and then pass the file to the printer. The printer driver will not be used. All images should be in RGB for printing to Epson printers.
2. Click the Page Setup… button to choose the proper printer and page size.
3. Check the Show More Options box. For Source Space, choose Adobe RGB.
4. For Print Space, choose the paper profile you will be using.
5. Check other settings as needed such as Scaled Print Size, Centered, etc.
6. Click the Print… button and the next Print dialog box appears.
7. Make sure the proper printer is selected in the Printer setting, and enter the number of copies.
8. Click on the Copies & Pages drop down arrows and choose Print Settings
Printing Black and White Images on the Epson Printers
Black and white printing is altogether different from color printing on the Epson printers. Each Epson printer model seems to have a different way of laying down its inks to create a black and white print.
Epson inks, in particular, have strong color casts (see Color Casts and Metamerism above), depending on the type of lighting conditions under which you are viewing the black and white image. This tendency is particularly noticeable in black and white images. The image’s appearance will change, sometimes dramatically, depending on light source. Natural, incandescent, and florescent lighting will all change your visual perception of the image color.
Also, as with color printing, using the wrong combination of settings in the print options will produce very undesirable results. Creating a simple grayscale strip and building a test page with different settings for your printer (similar to color printing test above) will get the best results for your personal printer.
The settings included below are the best that I have tested for black and white printing on the Epson 2200 in the site. I cannot impress upon you enough the importance of doing a grayscale test strip for your individual printer.
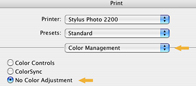
Note: To get a similar image with a lighter range of blacks, you can use the Same as Source option as in black and white option1 and leave the magenta setting at 0. Also using the No Color Adjustment with Same as Source can also remove some of the red. But by far, options 1 & 2 gave the best results for the Epson 2200 in the site.
The B/W Settings - Option 1
According to my grayscale test strips, using these setting yields images with slightly lighter grays that spread evenly over the white to black range. Most of the pink/purple cast (magenta) seems to reside in the ligher and lower mid-tone range. Remember all images should be in RGB for printing to Epson printers, even black and white images.
1. From the File menu, choose Print with Preview. The Print dialog box appears.
2. Use the Page Setup… button to choose the proper printer and page size.
3. For Source Space, choose Adobe RGB. Check the Show More Options box.
4. For Print Space, choose Same as Source.
5. Check other settings as needed such as Scaled Print Size, Centered, etc.
6. Click the Print… button, and the next Print dialog box appears.
7. Make sure the proper printer is selected in the Printer setting, and enter the number of copies.
8. Click on the Copies & Pages drop-down arrows and choose Print Settings.
9. For Media Type, choose the proper type from the drop-down list. Choose Color and move the Quality slider from Speed to Quality.Under Mode, choose Advanced and turn off High Speed.
10. Using the Printer Settings drop-down arrow, choose Color Management, and move the Magenta color slider to –5. Use the photoreal with gamma set to 1.8.
The B/W Settings - Option 2
Using these settings, my gray scale test strips yield images with overall darker blacks than option number one. Again, most of the color cast (magenta) seems to reside in the ligher and lower mid-tone range. I would say in many cases this setting matched my monitor as far as darks and lights go. You cannot see the color cast on your monitor. But, sometimes the backs are too dark on the dark end.
1. From the File menu, choose Print with Preview. The Print dialog box appears.
2. Use the Page Setup… button to choose the proper printer and page size.
3. For Source Space, choose Adobe RGB. Check the Show More Options box.
4. For Print Space, choose Printer Color Management, choose Relative Colormetric.
5. Check other settings as needed such as Scaled Print Size, Centered, etc.
6. Click the Print… button, and the next Print dialog box appears.
7. Make sure the proper printer is selected in the Printer setting, and enter the number of copies. 8. Click on the Copies & Pages drop-down arrows, and choose Print Settings.
9. For Media Type, choose the proper type from the drop-down list. Choose Color and move the Quality slider from Speed to Quality.Under Mode, choose Advanced and turn off High Speed.
10. Using the Printer Settings drop-down arrow, choose Color Management, and move the Magenta color slider to –5. Use the photoreal with gamma set to 1.8.
The B/W Settings - Option 3
This last method uses the color output setting above using ColorSync. This option can create an image with lots of reddish brown overtones (very warm, not sepia) throughout the image. In most cases, when viewed alone the images are very expectable to my test viewers. But, when compared to the black and white print options above, the colorcast is very noticeable. Some still preferred the warmer images. The darks have a very similar range and density as option 2 with the reddish cast in all areas of the image.
1. From the File menu, select Print with Preview. The Print dialog appears.
2. Use the Page Setup… button to choose printer and page size.
3. For Source Space, choose Adobe RGB. Check the Show More Options Box.
4. For Print Space, choose Printer Color Management, and for Intent, choose Perceptual.
5. Check other settings as needed such as Scaled Print Size, Centered, etc.
6. Click the Print… Button and the next Print dialog box appears.
7. Make sure the proper printer is selected in the Printer setting and enter the number of copies.
8. Click on the Copies & Pages drop-down arrows to choose Print Settings.
9. For Media Type, choose the proper paper type from the drop-down list.Choose Color and move the Quality slider from Speed to Quality.Under Mode, choose Advanced and turn off High Speed.
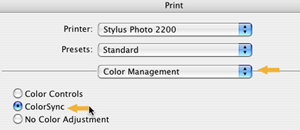
10. Using the Printer Settings drop-down arrow, choose Color Management, and then click ColorSync.