By the time you complete this lab, you should be able to:
pwd, mkdir, and cd commands.You will also get more practice with
You can review the instructions from lab01 if you are not sure how to do this.
The reason this step MUST be done on a SunRay is that we need to make sure you know how to access your home directory on strauss (the system where MATLAB is running), and also how to create subdirectories using MATLAB.
Most of the remaining steps in this week's lab can be done on a PC or Mac version of MATLAB if you prefer.
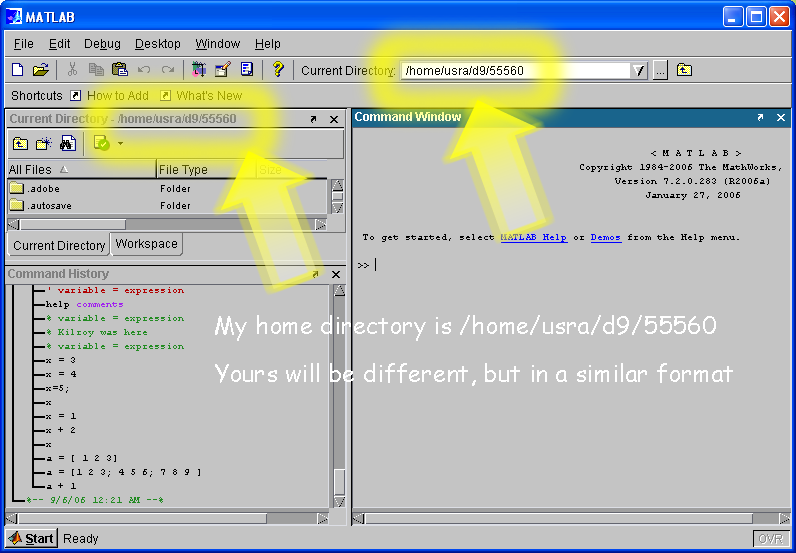
When you first startup Matlab, you should be able to find your "home directory" in the places indicated in the following diagram. Mine is /home/usra/d9/55560. Yours will be different from that, but still in a similar format:
Figure out what your home directory is, and make a note of it.
Now, in the MATLAB command window, type pwd, like this. The answer that comes back should show you your home directory:
>> pwd

ans =

/home/usra/d9/55560

>>
The reason is that MATLAB will typically start you off in your home directory. However, if we keep putting M-files in your home directory, after a while it will get very cluttered. So, it is good practice to create a folder (also called a sub-directory) for each course that you take where you use MATLAB.
To do this, type the following three commands in the MATLAB command window. Note the use of lowercase—in general don't use capital letters in MATLAB except when the instructions specifically indicate to do so! (An explanation of each command follows the example input/output)
>> mkdir cisc106
>> cd cisc106
>> pwd

ans =
/home/usra/d9/55560/cisc106
>>
mkdir cisc106, makes a new subdirectory (folder) called cisc106. This is the folder where you will store all of your labs for this semester.cd cisc106, changes your current directory to be cisc106. pwd, asks MATLAB to print the working directory. Note that the working directory is now your home directory with cisc106 stuck on the end of it.Notice that the places in the MATLAB window where you saw your home directory before (the places circled in yellow above) should now show your working directory with the addition of cisc106 stuck on the end, reflecting that this is now your "working directory". That means that this is where you will find the M-files that you store, for example.
Now we'll do the same thing again to move down one more level, into a directory for lab02. Do the following:
>> mkdir lab02
>> cd lab02
>> pwd

ans =
/home/usra/d9/55560/cisc106/lab02
>>
lab02 directory under cisc106. cd .. (that's cd dot dot).cd ~ (that's cd squiggle) In general, the squiggle (~), which is more properly called the "tilde", stands for your home directory.
cd ~ that means "change directory to my home directory"cd ~/cisc106 it means "change directory to the cisc106 that is immediately under my home directory"cd ~/cisc106/lab02 it means "go into lab02, which is inside cisc106, which is inside my home directory"Try each of these commands. Also try cd .. after each command to see where you end up. Do this until you are comfortable with what the ~ and .. mean.
Now, use the cd command to change into your ~/cisc106/lab02 directory. Then, type edit lab02a.m
The M-file editor window should come up. Put the following MATLAB commands into that file. Change the name in the file to your own, and the section to your own.
% lab02a.m   P. Conrad, for CISC106 lab02, Fall 2006, section 013
% Convert from kilometers per liter to miles per gallon


litersPerGallon = 3.7854118;
kmPerMile = 1.609344;

kmPerLiter = input('Enter kilometers per liter:');
milesPerGallon = kmPerLiter / kmPerMile * litersPerGallon;
message = [num2str(kmPerLiter) ' km/liter = ' ...
           num2str(milesPerGallon) ' miles/gallon' ];
disp(message);
Once you've typed this in ( or cut and pasted it, and changed the name and section number), try running it. Do you remember how to run an M-file once you've typed it in? If not, check lab01, and/or Chapter 1 of your textbook.
To understand how this M-file works, you may want to read over p. 29 and 30 in your textbook, specifically the part that starts with the heading "Initializing Variables With Keyboard Input". This explains the third line, namely:
kmPerLiter = input('Enter kilometers per liter:');
The rest of the program should be pretty straightforward—it is essentially similar to the program we did in lab last week.
To check whether the program is calculating accurate results, type in a value of 1 (for 1 liter per gallon), and check the result against the following table:
http://encarta.msn.com/media_701500646/Imperial_and_Metric_Conversion_Factors.html
(As it turns out, according to the web site http://www.teaching-english-in-japan.net/conversion/mpg, Europeans don't actually use km/liter to measure fuel economy, but rather a measurement called liters/100km.
I don't know first hand whether that is true or not—but either way, it makes an interesting MATLAB exercise. (Note: After I first wrote this, TA Timo Koetzing verified with first hand knowledge that this is true in Germany.) In the second part of this lab, you'll have an opportunity to develop a MATLAB program to convert from liters/100km to miles/gallon. But we are getting ahead of ourselves—first let's make a diary file to document the work we've done so far.
Create a diary file called lab02a.txt. In your diary file, do all of the following:
pwd to show that you are in the ~/cisc103/lab02 subdirectory (the ~ will be replaced with your actual home directory)dir to list the contents of the current directory
lab02a.m file, you might see a file called lab02a.asv. This is the MATLAB "automatic save" file. Don't worry about it—it's perfectly normal. type lab02a.m to list out the contents of lab02a.m >> lab02a Enter kilometers per liter:6 6 km/liter = 14.1129 miles/gallon >> % That's pretty close to what a Jeep Wrangler gets >>
diary off to end the recording. You'll upload both lab02a.m and lab02a.txt to WebCT in the final step of this lab. Now, still in the ~/cisc106/lab02 subdirectory, write your own M-file, called lab02b.m. This file should convert from liters/100km to miles per gallon.
Think about the units, and whether you need to multiply or divide.
Use the program above as a guide, and modify it as needed. Change not only the lines of MATLAB code, but also the comments at the top of the file.
Then make a script (i.e. a diary file) called lab02b.txt. This script should do all the same steps you did in lab02a.txt, except for your lab02b.m MATLAB program, instead of the lab02a.m MATLAB program.
(Note: I may sometimes use the word "script" to refer to a MATLAB diary file. For some folks, the word "script" might refer to an M-file. Both of these are reasonable usages of the word script, so it might be confusing. If you encounter the word "script", and are not sure whether it means diary file or M-file, you may want to ask the person using the word what they mean by it.)
While Step 1 of this week's lab MUST be done from a SunRay, you may do step 2 on any system, including a PC or Mac.
You should still create a cisc106 subdirectory, and a lab02 subdirectory under the cisc106 directory, and do your work for step 2 in that directory. However, cisc106/lab02 may be under some other directory instead of your "home directory—perhaps your C:\ drive, for example, if you are working on a Windows machine with a single hard disk.
Log on to MyCourses (WebCT) and find CISC106 (if it is not listed, tell your TA, and email your instructor!)
Follow the instructions for submitting an Assignment in WebCT (submit this as lab02). You should submit four files:
Generally submitting everything according to instructions: 10 pts.
And you are all finished!
Generally submitting everything according to instructions: 10 pts.